Shear beam load cells measure shear strain in a central web under load; bending beam load cells measure tensile and compressive strain on a cantilever’s top and bottom surfaces. The two geometries serve different capacity bands, side-load tolerances, and mounting footprints — and the right choice for your platform scale, conveyor, tank, or bench application depends on application mechanics, not price.
This page compares both form factors axis by axis and maps them to real-world decision scenarios, with links to Transcell’s SBS shear beam, DBS double-ended shear beam, and BSH bending beam product families for final spec confirmation.
Key Takeaway
Quick Decision Summary
Shear beam wins for: capacities 250 lb and above, platform scales with incidental side-load, tank legs, truck scales, and multi-cell weighing systems
Capacity crossover: 500 lb is the practical threshold — below this, bending beam is usually lower cost at equivalent accuracy; above this, shear beam dominates on durability and side-load tolerance
Side-load rule of thumb: if forklift bumps, vibration, or off-axis loading are possible, choose shear beam; otherwise bending beam is acceptable
Shear beam: measures shear strain in a web, ±0.02% to ±0.03% combined error, 250 lb–200,000 lb range
Bending beam: measures tensile/compressive strain on a cantilever, ±0.03% combined error, 50 lb–500 lb range
Comparison of Transcell SBS shear beam and BSH bending beam load cells for industrial weighing and scale system design.
Core Mechanics
What Is the Core Difference?
A shear beam load cell measures shear strain in a vertical web at the neutral axis of a rectangular steel beam. Strain gauges are bonded at 45° to the web’s surface and wired in a Wheatstone bridge; as load compresses one end of the beam and supports the other, the web’s shear strain changes the bridge resistance and produces a proportional mV/V output. The geometry is inherently tolerant of off-axis loading because shear strain at the neutral axis is largely independent of bending moment contributions.
A bending beam load cell measures tensile strain on the top surface and compressive strain on the bottom surface of a cantilever beam. Strain gauges are bonded along the cantilever’s upper and lower faces and wired into a bridge that cancels common-mode effects (temperature, axial force) while amplifying bending strain. The geometry is more sensitive to lateral force components — any load applied off the intended axis introduces additional bending moments the bridge cannot distinguish from the measurement load.
Real-world consequence: a forklift bumps the edge of a 2,000 lb platform scale. A shear beam under the platform absorbs the lateral force through its web geometry and recovers to zero within seconds. A bending beam in the same position either drifts its zero by 0.3% or more, or — if the impact exceeds safe overload — sustains plastic deformation in the cantilever and permanently miscalibrates.
Spec Comparison
Side-by-Side Comparison
The table below compares Transcell’s SBS and DBS shear beam series against the BSH bending beam series on the axes most buyers use to decide. Spec values represent standard production ranges; non-standard capacities and custom configurations are available on request.
Specification
Shear Beam (SBS / DBS)
Bending Beam (BSH)
Capacity Range
250 lb – 200,000 lb
50 lb – 500 lb
Combined Error
±0.02% to ±0.03% of rated output
±0.03% of rated output
Rated Output (mV/V)
2.0 or 3.0 mV/V
2.0 mV/V
Safe Overload
150% of rated capacity
150% of rated capacity
Side-Load Tolerance
High — ±2° angular misalignment without drift
Low — requires check rods for any off-axis loading
Mounting Type
4-hole bolt pattern, single-ended or double-ended
Cantilever with threaded stud or insert
IP Rating (Hermetic)
IP67 / IP68 (stainless variants)
IP65 typical; IP67 on select models
Typical Cost Tier
Mid tier
Entry tier (at matching accuracy)
Mounted comparison of double-ended shear beam and bending beam load cells for industrial and general-purpose weighing applications.
When to Choose Shear Beam
Best Fit Scenarios
Shear beams are the default choice when capacity is 250 lb or higher, when multi-cell platform arrangements are required, or when the installation environment carries side-load risk. The web geometry absorbs lateral force without measurement drift, the hermetic sealing supports IP67/IP68 for washdown and outdoor use, and the standard 4-hole bolt pattern is industry-compatible across most truck scale, tank leg, and hopper scale retrofits.
Specific scenarios where shear beam is the right answer:
Platform scales 500 lb and above, especially with forklift access or material-handling equipment nearby
Tank legs and vessel supports where wind load or thermal expansion introduces lateral force
Truck scales and vehicle weighing — use DBS double-ended shear beam series for capacities 5,000 lb and above
Conveyor weighing stations with vibration or sudden load shifts
Multi-cell summed platform systems using a summing junction box — shear beam corner-load tolerance simplifies calibration
For retrofits where a legacy bending beam failed or drifted under field conditions, a drop-in interchangeable shear beam replacement is often available — see the cross-reference hub for capacity and mounting matches.
When to Choose Bending Beam
Best Fit Scenarios
Bending beams are the efficient choice for low-capacity applications where side-load is negligible and cost matters. The cantilever geometry is compact, the strain gauge arrangement is well-suited to sub-500 lb sensitivity, and the BSH series delivers ±0.03% combined error at capacities where a comparable shear beam would be oversized or over-priced.
Specific scenarios where bending beam wins:
Bench scales and laboratory weighing — 50 lb to 500 lb capacity, indoor environment, axial loading only
Small platform scales in controlled environments (counting scales, retail postal scales)
OEM integrations where cost per channel matters and side-load risk is designed out mechanically
Conveyor weigh-station replacements at sub-500 lb capacity with check rods in place for lateral stability
Bending beams require mechanical attention to the load path — check rods, rigid mounting brackets, and verified axial loading prevent the zero drift that cantilever geometry is susceptible to. See BSH bending beam product details for mounting hardware options and capacity-specific recommendations.
Capacity Crossover
Decision Matrix
Capacity is the strongest single predictor of which geometry fits. Below 500 lb, bending beam is usually the lower-cost answer at equivalent accuracy. Between 500 lb and 5,000 lb, the decision depends on side-load environment and mounting constraints. Above 5,000 lb, shear beam dominates on durability, side-load tolerance, and industry mounting compatibility.
Worked Example 1 — 2,000 lb Platform Scale in a Warehouse
Forklifts bump the scale edges regularly. Bending beam at this capacity would drift zero within days of forklift contact and require weekly recalibration. Four SBS shear beam cells in a corner-mount configuration, summed through a junction box, absorb the lateral forces without drift and hold calibration for 12+ months between scheduled checks. Choose shear beam.
Worked Example 2 — 100 lb Laboratory Bench Scale
Indoor environment, axial loading only, no vibration source. BSH bending beam at 100 lb capacity delivers ±0.03% accuracy at about 60% of the cost of a comparable shear beam, with a smaller mounting footprint that fits the bench-scale form factor. Choose bending beam.
For applications where the capacity sits in the 500–5,000 lb uncertain band — retail floor scales, conveyor weigh-stations, food processing platforms — the deciding factor becomes the environment. If forklifts, wheeled carts, vibration sources, or off-axis product movement are present, select shear beam; if the loading is consistently vertical and controlled, bending beam remains viable. Accuracy class compliance with OIML R60 is achievable with both geometries at matching capacities.
Installation Differences
Shear Beam Mounting
Standard shear beam installations use a 4-hole bolt pattern — typically M12 or M16 grade-8 hardware torqued to 40–60 N·m per the datasheet. Single-ended shear beam (SBS) bolts fixed at one end with load applied at the free end; double-ended shear beam (DBS) supports load at both ends with fixed mounting in the middle. Spherical washers are recommended for platform corner-mounts where the frame may flex under load, and shielded twisted-pair cable runs back to a summing junction box for multi-cell systems.
Bending Beam Mounting
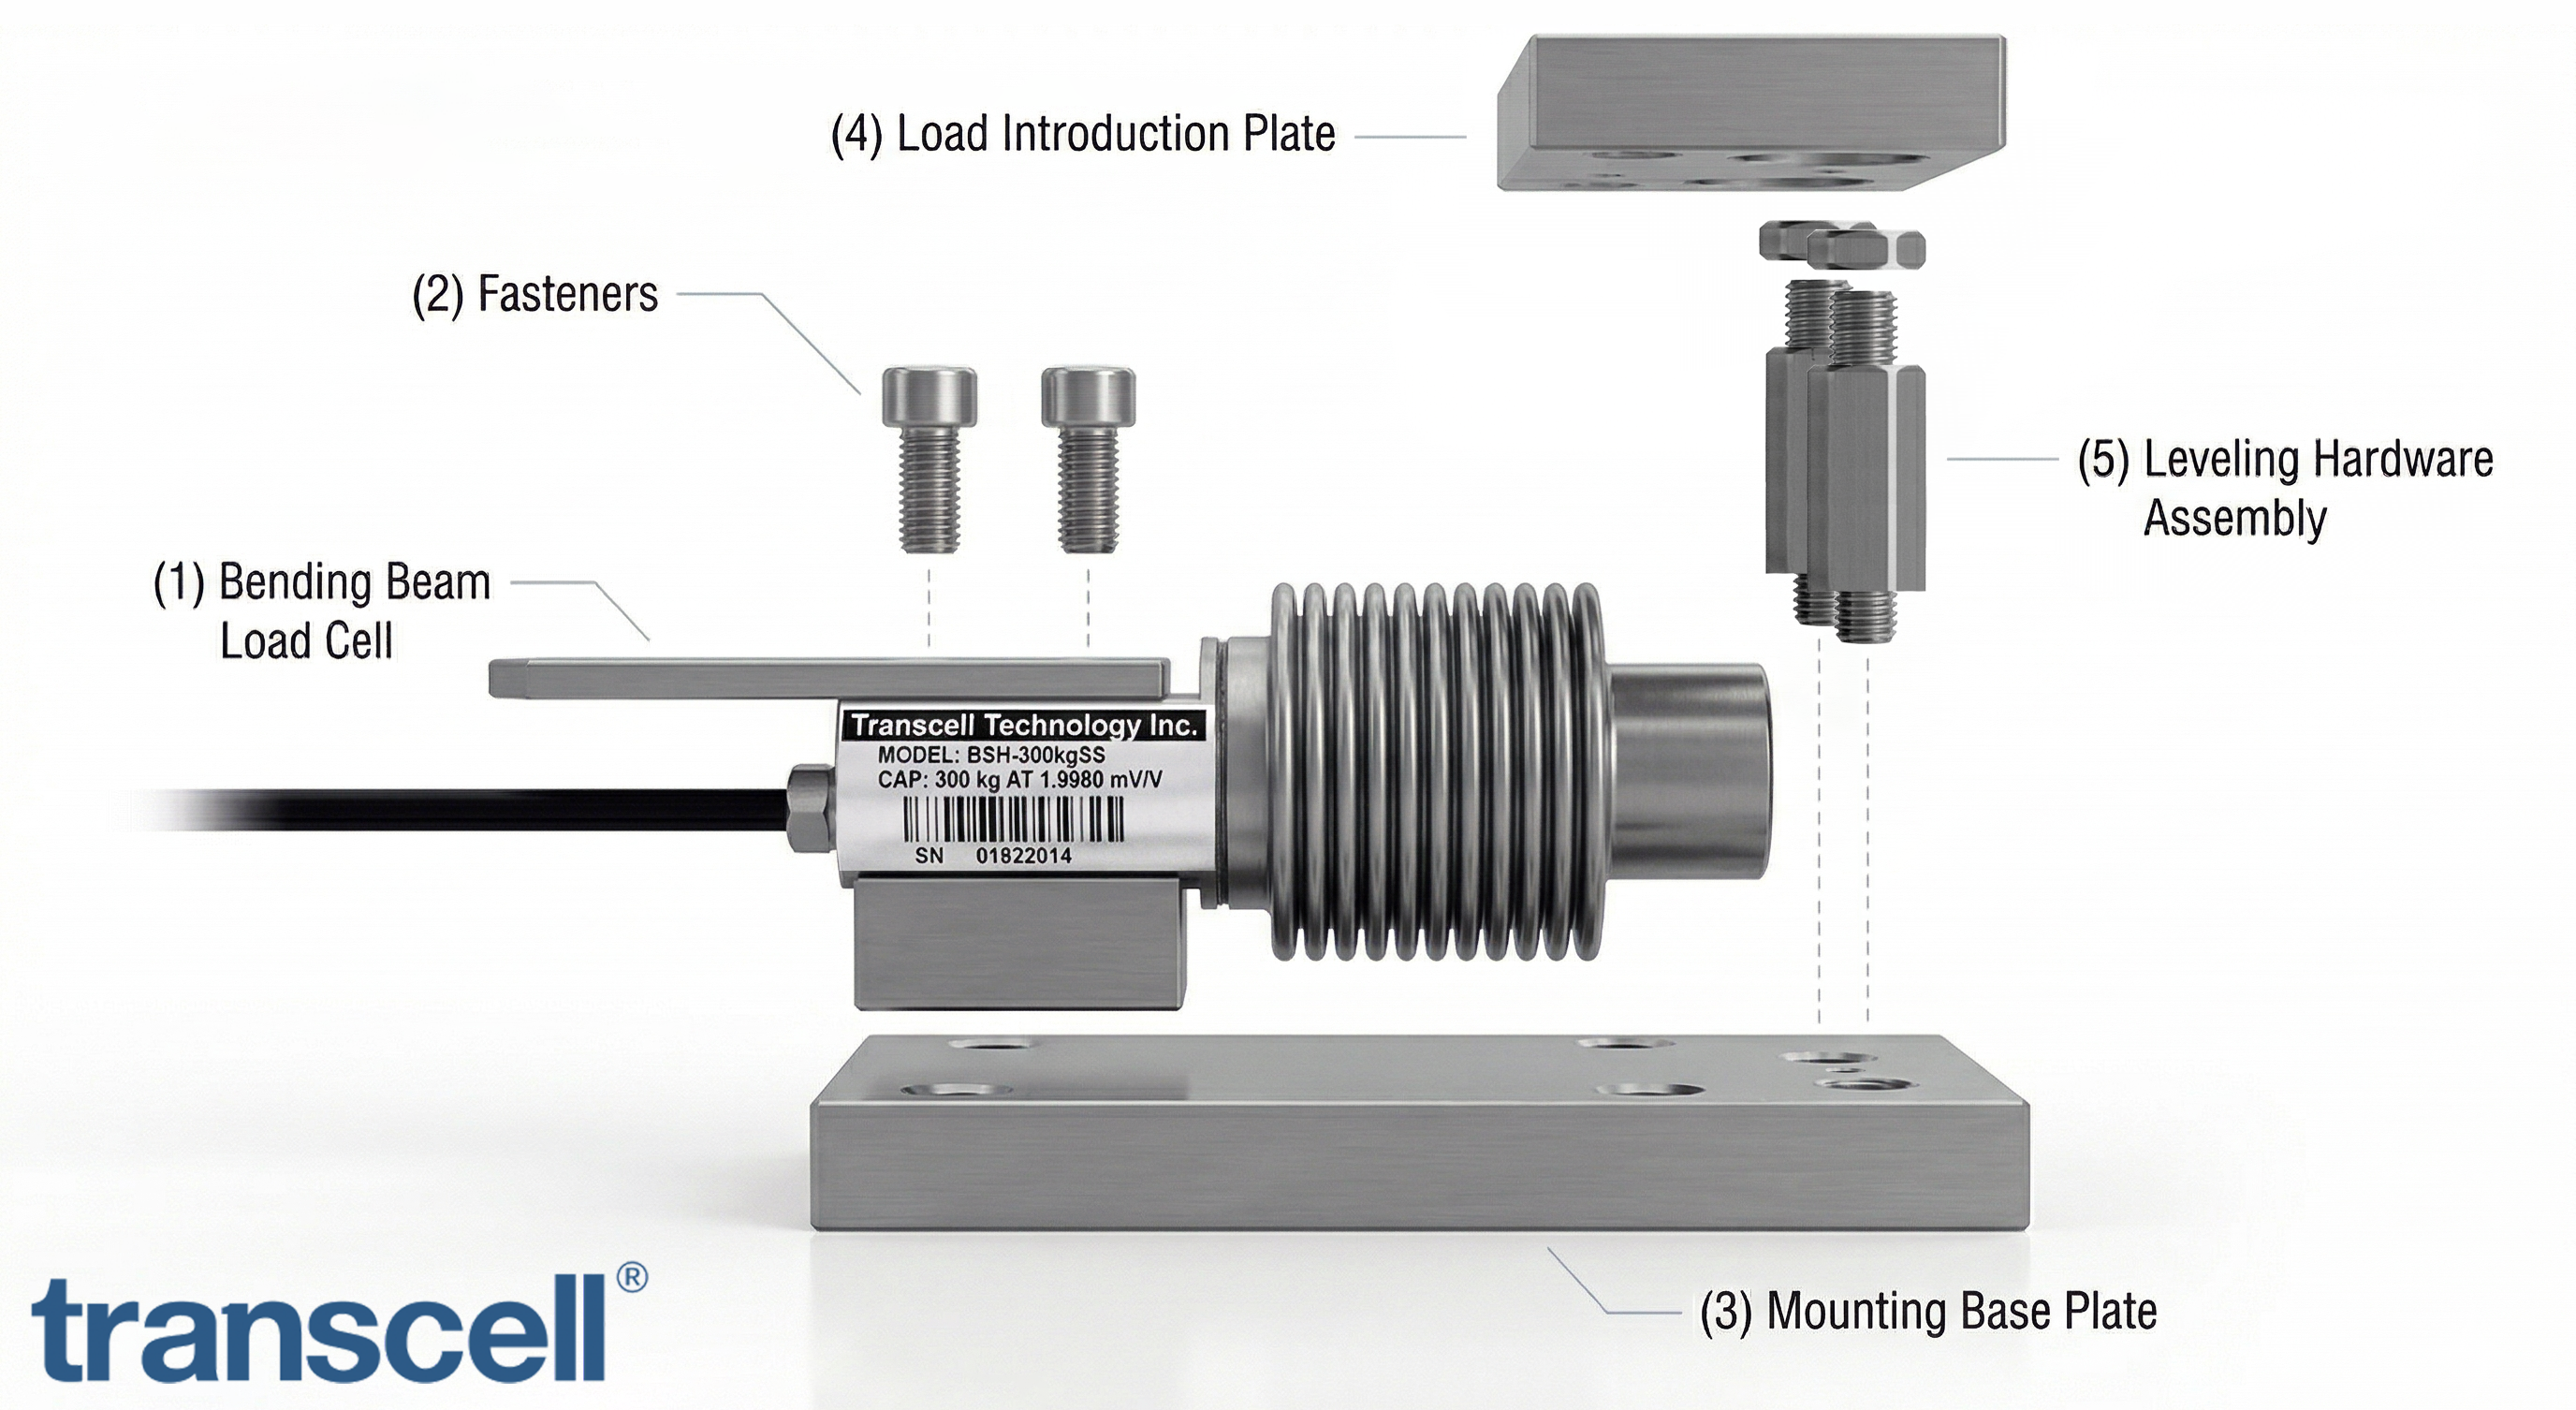
Bending beam installations require more mechanical discipline. The cantilever must be mounted rigidly at the fixed end, with the load applied at the free end through a load button or bumper that guides force axially. Check rods — rigid horizontal braces between the load platform and a fixed reference frame — are mandatory in any installation where lateral movement is possible. The check rod absorbs side-load that would otherwise reach the cantilever and introduce measurement error. Skipping check rods on a bending beam installation is the single most common cause of zero drift and eventual cell failure in the field.
Bending beam load cell installation diagram showing key mounting components used in a weighing module assembly.
For step-by-step mounting of either geometry, see the installation guide.
FAQ
Can I replace a bending beam with a shear beam in an existing installation?
Yes, provided the mounting pattern accommodates the shear beam’s 4-hole bolt layout and the capacity match is verified. Common retrofit scenario: a platform scale originally spec’d with a bending beam that now sees forklift traffic — swapping to an SBS shear beam upgrades side-load tolerance without requiring new indicator wiring. Confirm mV/V output match (2.0 vs 3.0) before the swap.
Which geometry has better accuracy?
Both can achieve ±0.02% to ±0.03% combined error at matching capacities. Shear beam typically edges ahead at capacities 1,000 lb and above due to better side-load rejection. Bending beam at sub-500 lb capacity delivers equivalent accuracy at lower cost when the installation environment eliminates lateral force contamination.
Why do bending beams require check rods?
A bending beam’s cantilever geometry cannot distinguish between the vertical measurement load and any horizontal side-load — both produce bending strain in the cantilever. Check rods bridge the load platform to a rigid reference frame, absorbing horizontal forces before they reach the load cell. Without check rods, any lateral movement — platform rock, cart impact, vibration — shows up as zero drift or span error.
Is a shear beam always more expensive than a bending beam?
At matching capacities below 500 lb, bending beam is usually 30–40% less expensive. Above 500 lb, the cost gap narrows and then reverses — shear beam is the cost-effective choice at 1,000 lb and above because it doesn’t require check rod hardware, and its longer service life in side-load environments produces lower total cost of ownership.
Contact Us
Still Undecided? Talk to an Application Engineer.
Describe your capacity, mounting constraints, and environment — we’ll recommend shear beam or bending beam with the specific Transcell series that fits. Application engineering responds within 24 business hours.
Our site uses cookies to collect the necessary data to improve your browsing
experience and customize content based on your interests.
Uploaded
Failed
Transcell Support
Transcell AI Assistant
Ask anything about your Transcell device
I can help with setup, calibration, wiring, troubleshooting, error codes, and manual guidance for Transcell products. For model-specific steps, I may first ask for the exact model number so I can provide the correct documented instructions.
AI assistant — verify critical specs against the official datasheet. Call (847) 419-9180 for sales/RMA.